


Laying a tile floor in your kitchen, bathroom, or any other room in the house doesn’t have to be daunting. Follow these simple instructions to learn how to lay a beautiful tile floor in a weekend!
 MATERIALS
- floor tile (ceramic, porcelain or travertine)
- tape measure
- straight edge ruler
- chalk line
- tile spacers
- thinset mortar
- mixing bucket
- notched trowel
- tile saw
- tile grout
- rubber trowel
- sponge
INSTRUCTIONS
- Clean the floor. Remove all dust and debris from the floor to make sure the tile will lay evenly. If the tile will lay against any existing carpet or other flooring, tape it off so it doesn’t get mortar or grout on it while you are working.
- Find the room’s center. Measure the room to find its center, then snap two chalk lines that intersect at the center of the room. This will be your starting point for laying the tile.
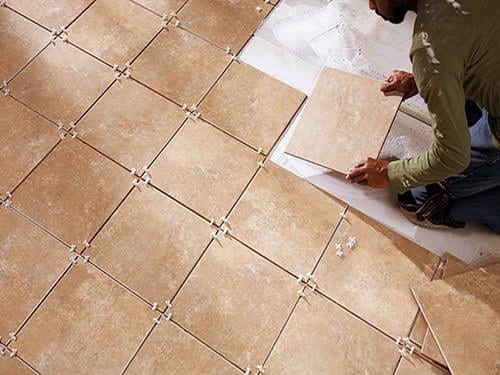
- Lay the tiles. Start with a dry run. Place the tiles on the floor starting at the center and use your spacers to lay them evenly. Decide what size spacers you want to use depending on the look you want to achieve. Use a straight edge to ensure the tiles are aligned correctly.
- Mix the thinset mortar. Pour the dry thinset into a large bucket. Add a small amount of water and mix until the texture is the consistency of mayonnaise. Let the mortar stand for about 10 minutes before using. Only mix as much as you can use in about 2 hours so it doesn’t dry out. Follow directions on the package for more detailed instructions.
- Apply the mortar. Work on your floor in 2×2′ sections at a time. Remove the tiles from your dry run in the section you are working on, then use a notched trowel to spread the mortar on the floor. Work with the trowel at a 45 degree angle, and press down firmly so the notches scrape the floor. This will create an even layer of mortar for your tiles to lay on.
- Set the tiles. Carefully lay the tiles in place over the mortar. Press down firmly and with a slight twist of the wrist to make sure it sets. Use an even amount of pressure on all the tiles to keep the surface of the tiles even with one another. After laying a few tiles, you can lay a flat board over the tiles and lightly pound the top with a rubber mallet to help the tiles even out.
- Place the spacers. As you lay rows of tile, place spacers between each one to ensure a uniform distance between each.
- Trim odd tiles. More than likely, your tiles will not fit exactly against all of your walls. Measure and mark the tiles that need to be trimmed, and then use a tile saw to make the cuts. It’s helpful to cut the tiles after the whole tiles have been laid to make sure you get accurate measurements.
- Let it dry. When all of your tiles and spacers have been laid, let them dry overnight.
- Apply the grout. After the tile is set and you have let the floor dry overnight, remove the spacers and apply the grout. Use a rubber trowel to spread the grout across the tiles. Work at an angle to make sure the grout fills the space between each tile completely.
- Remove excess grout. When the grout is firm to the touch (about 5 minutes), wipe away the excess with a damp sponge. Repeat this process until the floor is clean, rinsing out your sponge often and being careful not to remove any grout from the tile joints.
- Seal the grout. If your new tile floor is in a bathroom, it is especially important to use a grout sealer so moisture doesn’t seep into your new floors and your grout doesn’t stain over time. Follow the directions on the package, but most grout sealers should be applied after the grout has set for a few days.